Lone Wolf Freedom Wolf Lower Parts Kit Installation
In this post we are going to install a Lone Wolf lower parts kit into a Freedom Wolf 80% frame. The last post covered completing the frame and getting it ready to install the parts. You can check view the series here:

- Lone Wolf Freedom Wolf 80% Lower Build
- Lone Wolf Freedom Wolf Lower Parts Kit Installation
- Assembling the slide parts kit.
- Test firing and overall review.
As I mentioned in the previous post, I'm not going to make this a complete how to. There are others out there if you need details for every step, but this will go through the general installation. The Freedom Wolf takes mostly Gen 3 lower parts, but some, like the magazine release is a Gen 4 part. Also, a lot of the lower parts kits out there don't come with the locking block that you need. You can piece together what you need, but I decided to use the kit that comes from Lone Wolf as it comes with all of the right parts. You can get it from Lone Wolf here: LWD Frame Completion Kits for Timberwolf. I ended up buying mine through Rainier Arms for about $10 less than from Lone Wolf: LWD Frame Completion Kits for Timberwolf. Rainier doesn't have it in stock as often, but they offer it a little cheaper.
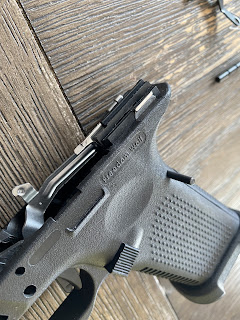
I started off by installing the small spring for the slide takedown lever.

Make sure the spring is pressed all the way down, then hold it down as you slide the takedown level into place:

Next I installed the magazine release, first by installing the spring into the magazine well and holding it out of place while I inserted the release. It's difficult to get a great picture, but here is an idea of it:

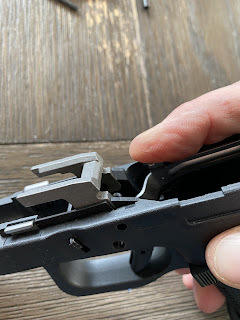
The Lone Wolf parts kit has an adjustable trigger stop, which has to be installed before the fire control assembly is installed:

Since this isn't designed to be a complete guide, you may have to look up the detailed assembly steps, but it should look like this before it goes in the gun:


Just did a freedom wolf 9mm build.. came out great and already want another one! I
ReplyDeleteThen, place the Cast Iron in the oven set to 500 to 550 degrees Fahrenheit with the COOKING SIDE FACING THE BOTTOM OF THE OVEN. This allows for any excess oil to drain off to the sides, and prevents pooling during the seasoning process. The higher heating temp allows for the oil to truly 'cook' as it should as opposed to just 'gumming up' at lower temps. Cook undisturbed for 1 hour. Iron Drapery Rods
ReplyDelete